


 Widgets offer interesting and functional ways of adding content to the layout of a Blogger blog. Using the Blogger widget API, many third party providers offer widgets for Blogger users to install in only a few clicks. Such widgets can be used to add content (eg: banners, slideshows, JavaScript functions) to the end-users blog, and also to help promote the sites from which they originated.
Feedburner, for example, offers users the ability to easily add a BuzzBoost widget (a list of recent RSS items) to their Blogger blog using the one-click widget installer. Similarly, Widgetbox allows members to install any of their widgets to a Blogger blog with ease.
In this tutorial, I’ll explain how you can create a simple widget which Blogger users may install in their Blogger layout with just a few clicks of the mouse. This in turn could offer your readers a valuable resource and help promote your site to other potential readers.
How installable Blogger widgets are formed
To create an installable Blogger widget, you first need to design the content which is to be displayed in the end-user’s blog. This content consists of HTML or JavaScript code so that it can be displayed (or perform it’s function) when displayed in the active blog pages.
Once you have designed the content of the widget, you will need to include this as part of a web form which includes a “submit” button. This enables people to submit the form (which contains your widget’s content) to Blogger; in turn, the Blogger API processes the widget content and adds this as the content for an HTML/JavaScript widget to the user’s blog.
Creating your widget content
The content of your Blogger widget can include anything you want, so long as this is valid (working!) HTML or JavaScript code.
To show you how to make a simple widget, I’ll demonstrate how to make a Blogging Tips banner which can be installed as a widget in a Blogger powered blog.
Here is the code which will be inserted as the widget’s content:
<a href="http://www.bloggingtips.com"><img src="http://www.bloggingtips.com/wp-content/uploads/2008/11/blogging-tips-banner.gif" alt="Blogging Tips" width="250px" height="36px" border="0" /></a>
In order for this HTML code to be parsed properly by Blogger’s widget API, we need to replace all special characters with their HTML equivilents:
- All < should be replaced with <
- All > should be replaced with >
- All & should be changed to &
- All ” should be replaced with ‘ instead (as Blogger always changes double quotes to single ones when used in the template code or widget contents)
Once we have “escaped” all of these special characters, the modified code will appear like this instead:
<a href='http://www.bloggingtips.com'><img src='http://www.bloggingtips.com/wp-content/uploads/2008/11/blogging-tips-banner.gif' alt='Blogging Tips' width='250px' height='36px' border='0' /></a>
For the purpose of this tutorial, I won’t go into much detail about building web forms (this subject alone would provide enough content for a whole series of posts!). Instead, I will only explain about the form elements required to make an installable widget for Blogger.
Here is an overview of the most basic form code required to make an installable Blogger widget:
<form method="POST" action="http://www.blogger.com/add-widget">
<input type="hidden" name="widget.title" value="Visit Blogging Tips!"/>
<input type="hidden" name="widget.content" value="<a href=’http://www.bloggingtips.com’><img src=’http://www.bloggingtips.com/wp-content/uploads/2008/11/blogging-tips-banner.gif’ alt=’Blogging Tips’ width=’250px’ height=’36px’ border=’0′ /></a>“/>
<input type=”hidden” name=”widget.template” value=”<data:content/>” />
<input type=”hidden” name=”infoUrl” value=”http://www.bloggingtips.com”/>
<input type=”hidden” name=”logoUrl” value=”http://www.bloggingtips.com/wp-content/uploads/2008/11/bt-icon.gif”/>
<input type=”submit” name=”go” value=”Add Blogger Blogging Tips Banner”/>
</form> The first line includes the most basic information about this form, ie: where to send the contents to for processing.
The second line includes the title we would like to use for the widget. This title will be displayed in the blog layout, and can be changed by the end-user after installation. Do not include this line if you want the title of this widget to be blank by default.
The third line(s) include the modified widget code which will produce the linked banner image in the widget. I have highlighted this in bold so you can easily distinguish this from other content in our form. When making your own installable widgets, this is the line in which you will place your widget content. Be sure to include all of your widget content between straight quotes as in the example above. Any line breaks will be interpreted as such when your widget content is parsed, so be sure not to add line breaks unless they are required to make your content function correctly.
Note: in the example above, I have allowed the code to “wrap” within the post container. No line breaks have been deliberately inserted
The fourth line includes the template for the widget. This is actually an optional line as (at present) we can only use the template data:content. In the future it may be possible to use a different widget template (for example, to add a modified Labels or Archives widget) but at present there is no documentation to support this, and my own efforts to manipulate the template for widget installers have not produced results. If anyone does know how this can be achieved, please do let me know by leaving a comment!
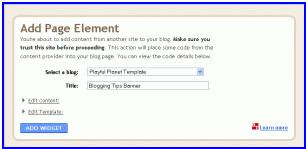
The fifth line (optional) provides a URL which the user can visit for information about the widget. This URL will be accessible on the widget installation page:
Similarly, in the sixth line of our example, you can optionally add the url to a small logo to provide your widget with your website’s “brand” identity.
The seventh line adds a simple “submit” button to the form using the title you specify, while the final line closes the form.
Take a look at this page to see an example of this form in action. This is a very basic version of the form and only the submit button is displayed. When clicking on this button, you will be prompted to add the Blogging Tips banner widget to your Blogger blog.
You can also download the code used for this installable Blogger widget below to use as a template for your own widget installers:
Source Code for installable Blogger widget
I hope this tutorial has provided you with the basic knowledge required to begin building installable widgets for Blogger! Using the code from this tutorial as a basic template, you can build your own Blogger widgets to promote your own blog, add useful tools for other bloggers, or even just as a fun excercise to help you learn more about this free blogging service.
Feel free to let us know if you have created your own Blogger widgets or would like to expand on the information provided here by leaving your comments below.
Source : problogger.net


0 comments:
Post a Comment